wget时显示无法建立SSL连接

前言

由于众所周知的原因,许多域名解析已被污染或者高墙,无法访问。

解决 1

进入IPAddress这个网站,在搜索框内输入 wget 地址即可查询真实 IP 地址。

这里以 Github 为例

1
2
3
[root@master ~]# vim /etc/hosts
192.30.253.112 github.com
199.232.28.133 raw.githubusercontent.com

解决 2

在 wget 请求前加上代理

如wget https://ghproxy.com/https://raw.githubusercontent.com/xxx

解决 3

尝试在原命令后补上--no-check-certificate

OpenLiteSpeed安装使用与部署Web网站

前言

OpenLiteSpeed 是 LiteSpeed EnterPrise 的社区版本,相较 Nginx 很多扩展如 Brotli、nginx-cache-purge 等扩展,会因为更新的不及时导致对最新 Stable 版本的不支持,同时也没有企业级的保障。 而 OpenLiteSpeed 的组件有官方进行主要维护和更新,提供商用企业级的体验。

在性能上,LiteSpeed Tech 提供的 BenchMark 中,在 WordPress、Joomla、OpenCart、ModSecurity、小型静态文件、HTTP/2、HTTP/3 的测试上都比 Apache HTTPD 和 Nginx 有这更好的表现,这不仅仅是跑个 Hello World 而是进行一个完整的测试。

根据其官网介绍,OpenLiteSpeed 是一个轻量级 Web 服务,非常适合部署一些中小型网站,其特点反应迅速,自带的 Cache 高性能缓存功能可以大大提升 PHP 的执行效率(特别是 WordPress 系统)

准备

根据官方的安装文档说明,服务器系统仅支持 CentOS、Debian 以及 Ubuntu

还需要一个域名和 SSL 证书对后续 Web 网页进行部署

安装

OpenLiteSpeed 安装

1
2
3
4
5
6
7
8
9
10
11
12
13
14
15
16
17
###CentOS:
CentOS 5:
rpm -Uvh http://rpms.litespeedtech.com/centos/litespeed-repo-1.1-1.el5.noarch.rpm
CentOS 6:
rpm -Uvh http://rpms.litespeedtech.com/centos/litespeed-repo-1.1-1.el6.noarch.rpm
CentOS 7:
rpm -Uvh http://rpms.litespeedtech.com/centos/litespeed-repo-1.1-1.el7.noarch.rpm
CentOS 8:
rpm -Uvh http://rpms.litespeedtech.com/centos/litespeed-repo-1.1-1.el8.noarch.rpm

yum install openlitespeed

###Debian & Ubuntu:
Debian 7, 8 & Ubuntu 12,14,16,18 :
wget -O - http://rpms.litespeedtech.com/debian/enable_lst_debian_repo.sh | bash

apt-get install openlitespeed

PHP 安装

默认安装的 PHP 版本目前为 PHP7.4,无须自己再手动安装

如果需要自己安装高版本(不建议,因为可以出现不兼容等未知错误)可以参考以下操作进行

1
2
3
4
5
6
7
8
###CentOS:
yum install epel-release
yum install lsphp81 lsphp81-common lsphp81-mysql lsphp81-gd lsphp81-process lsphp81-mbstring lsphp81-xml lsphp81-mcrypt lsphp81-pdo lsphp81-imap lsphp81-soap lsphp81-bcmath
ln -sf /usr/local/lsws/lsphp81/bin/lsphp /usr/local/lsws/fcgi-bin/lsphp5

###Debian & Ubuntu:
apt-get install lsphp81
ln -sf /usr/local/lsws/lsphp81/bin/lsphp /usr/local/lsws/fcgi-bin/lsphp5

启动 OpenLiteSpeed

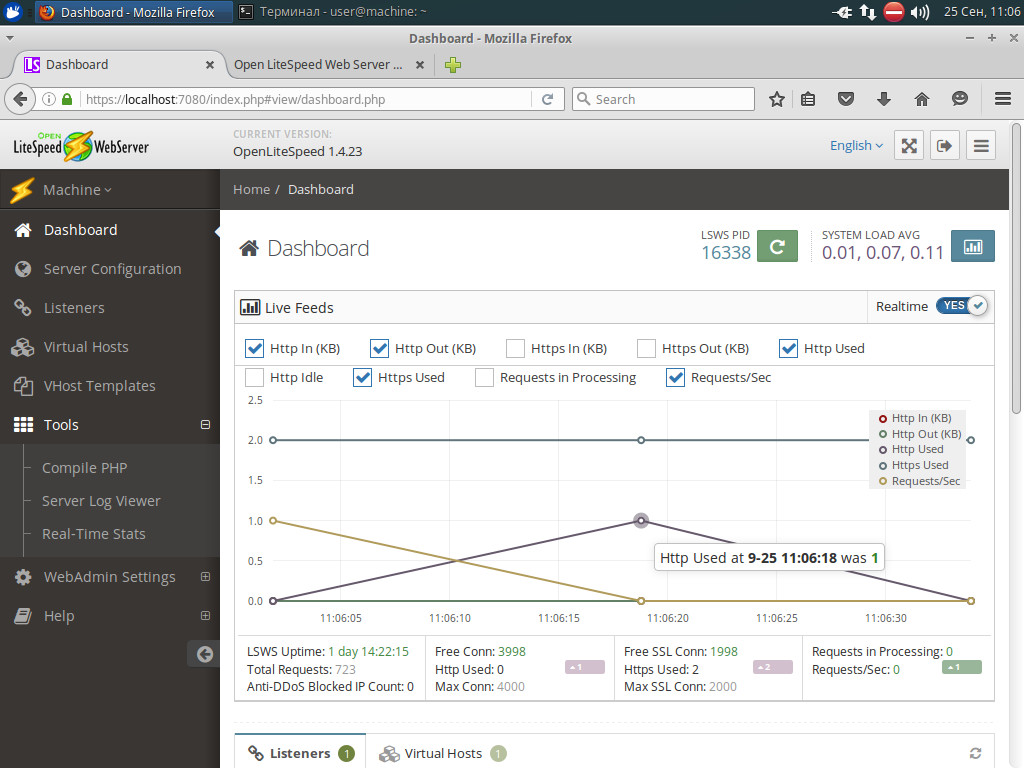
键入/usr/local/lsws/bin/lswsctrl start打开浏览器,打开 IP:8088 如果看到

测试页面,即表示安装成功。

尔后通过之前的安装过程创建的账密登录 IP:7080 后台系统即可。倘若忘记账密可以通过键入sudo /usr/local/lsws/admin/misc/admpass.sh强制修改账号密码,再进入系统。

进入系统,右上角可以切换成中文显示

监听器配置

点击监听器,开始端口的设置,默认 Default 其实便是 8088 便是刚刚的测试页面。

点击右上角,添加端口,我们可以按图所示,添加 80 以及 443 端口。

假如你手上有 HTTPS 的证书,请在 80 和 443 端口编辑,勾上加密链接为是,然后在 SSL 子选项填入 KEY 和 CRT 文件,证书链选择否即可(同理如果是 PEM 的证书,证书链请勾选是)

如果使用的是 acme.sh 的证书,则需要注意定时任务续期的问题,这里提供简单操作如下:

1
2
wget -O -  https://get.acme.sh | sh
acme.sh --issue -d morefish.cc -w /usr/local/lsws/morefish.cc/html

签发成功则会生成 Key 的路径,然后填入刚刚 SSL 子模块/usr/local/lsws/binol.net/ssl/morefish.cc.key 和/usr/local/lsws/binol.net/ssl/fullchain.cer 然后选择证书链为是即可。

新建虚拟主机

新建虚拟主机前,请先准备下目录的创建,默认 Web 网站的路径为/usr/local/lsws 下新建 html 和 logs,这里我们假设我们的域名为 morefish.cc

设置完毕,以后便可以使用$VH_ROOT 变量指代/usr/local/lsws/morefish.cc/*

这里简单说明下变量的使用:

变量名 路径 说明
$SERVER_ROOT /usr/local/lsws/ OpenLiteSpeed 默认部署 Web 网站根目录
$VH_ROOT /usr/local/lsws/$VH_ROOT 虚拟主机的根目录,也可以说是 Web 网站的根目录。

注意第一次配置文件会报异常,那是提示目录没有那个文件,是正常错误,点击 CLICK TO CREATE 就能帮你创建配置文件,之后再保存即可。

常规设置

在常规子选项设置下,我们继续设置 HTML 的文档根为$VH_ROOT/html/,域名便填写 morefish.cc,开启 GZIP 压缩,不启用 IP 地理位置定位。索引文件设置里,我们不使用服务器索

引文件,索引文件设置填写为 index.php, index.html,最后自动索引选择否。

日志设置

在日志的子选项设置下,我们按图设置即可,当然可以根据自己所需实际需要设置,这里不做累述。

安全设置

在安全子选项设置下,访问控制里,我们允许列表填写*即可,代表允许所有 IP 访问,当然这里也可以添加拒绝访问的 IP 或者 IP 段。

重写设置

在重写子选项设置下,我们开启重启和自动加载 .htaccess,这样你的网站就可以像 Apache 一样开启伪静态了。

SSL 设置

在 SSL 子选项设置下,因为我们在监听器配置下已经完成,所以在虚拟主机这就无需另外设置,只需要配置映射就可以了。除非是多重映射,我们再另外设置。

端口映射设置

虚拟主机就创建好了,接下来我们需要把这个虚拟主机映射给相应的监听器。点击监听器 → 查看 → 虚拟主机映射 → 添加 → 选择好域名即可。

同理 443 监听器设置一样。

数据库部署

这里我们选择 MySQL 普通安装,键入sudo apt-get install mariadb-server mariadb-client即可完成安装,安装执行下列语句mysql_secure_installation按提示进行安全设置,最后systemctl restart mariadb重启 MySQL 即可。

注意安装 MySQL 要创建好子账户,和配置好开放权限,否则外网无法访问数据库。

OpenLiteSpeed 调优

开启缓存

OpenLiteSpeed 默认已经安装了 LiteSpeed Cache 缓存,在服务器模块那就能看到,结合自身需要开启即可。

按如图所示完成配置即可开启 Cache 缓存,加快 Web 网站访问速度。

调整上传文件大小限制

在虚拟主机 → 域名 → 常规下修改 php.ini 结合自身需要调整即可。

同样的也可以去 OpenLiteSpeed 目录下更改,具体地址为/usr/local/lsws/lsphp74/etc/php/7.4/litespeed/php.ini注意修改完毕,最后记得键入touch /usr/local/lsws/admin/tmp/.lsphp_restart.txt 或 sudo systemctl restart lsws完成服务重启。

调整 GZIP 压缩

我们在前面部署虚拟主机的时候已经开启了 GZIP 压缩,我们可以进一步调优,具体操作在服务器 → 调节下修改 GZIP/Brotli 压缩

如图所示完成配置即可。

安装 PHP 扩展

OpenLiteSpeed 并未提供可视化一键安装 PHP 扩展的功能,但是一些诸如 redis 和 curl 等 php 扩展的必要性也是不能忽视的。

1
2
3
4
5
###CentOS
sudo yum install lsphpXX-pecl-PECL_NAME

###Debian & Ubuntu:
sudo apt install lsphpXX-PECL_NAME

值得一提的是,XX 为特定的 PHP 版本,PECL_NAME 为您希望安装的 PHP 扩展。这是官方的库,如果是一些偏冷门的扩展,则可能需要查阅官方文档才行。最后记得键入touch /usr/local/lsws/admin/tmp/.lsphp_restart.txt 或 sudo systemctl restart lsws完成服务重启。

写在最后

这是继 OneinStack 和宝塔另类的轻量 Web 服务,建议用在小型网站上。

说明引用:

OpenLiteSpeed 安装与使用-开源轻量高性能的建站面板-免费 SSL,多 PHP,LSCache

安装 OpenLiteSpeed+Redis 并部署一个 WordPress,以及配置 SSL 和性能调优

LiteSpeed Documentation

解决Debian下启动MySQL报61 Connection refused

1.问题说明

Debian-9.12.1-AMDx64

使用sudo apt-get install mariadb-server mariadb-client在线非编译安装方式

简述:该问题出现一般是没有开放账号权限给外 IP 访问

2.解决思路

在伺服器键入设置mysql_secure_installation重设规则,前提是确认好是否安装到位 MySQLdpkg -l | grep mysql,重设规则这里跳过不需设置 root 密码。

1
2
3
4
5
6
7
8
9
10
11
12
13
14
15
16
17
18
19
20
21
22
23
24
25
26
27
28
29
30
31
32
33
34
35
36
37
38
39
40
NOTE: RUNNING ALL PARTS OF THIS SCRIPT IS RECOMMENDED FOR ALL MariaDB
SERVERS IN PRODUCTION USE! PLEASE READ EACH STEP CAREFULLY!
In order to log into MariaDB to secure it, we'll need the current
password for the root user. If you've just installed MariaDB, and
you haven't set the root password yet, the password will be blank,
so you should just press enter here.
Enter current password for root (enter for none):
OK, successfully used password, moving on...
Setting the root password ensures that nobody can log into the MariaDB
root user without the proper authorisation.
You already have a root password set, so you can safely answer 'n'.
Change the root password? [Y/n] n
... skipping.
By default, a MariaDB installation has an anonymous user, allowing anyone
to log into MariaDB without having to have a user account created for
them. This is intended only for testing, and to make the installation
go a bit smoother. You should remove them before moving into a
production environment.
Remove anonymous users? [Y/n] y
... Success!
Normally, root should only be allowed to connect from 'localhost'. This
ensures that someone cannot guess at the root password from the network.
Disallow root login remotely? [Y/n] n
... skipping.
By default, MariaDB comes with a database named 'test' that anyone can
access. This is also intended only for testing, and should be removed
before moving into a production environment.
Remove test database and access to it? [Y/n] y
- Dropping test database...
... Success!
- Removing privileges on test database...
... Success!
Reloading the privilege tables will ensure that all changes made so far
will take effect immediately.
Reload privilege tables now? [Y/n] y
... Success!
Cleaning up...
All done! If you've completed all of the above steps, your MariaDB
installation should now be secure.
Thanks for using MariaDB!

重启服务systemctl restart mariadb观察是否正常。

若不正常继续键入netstat -tap | grep mysql确认 MySQL 是否在 listen 状态

正常继续键入mysql -u root -p在本地登陆 MySQL,若忘记密码可以去sudo cat /etc/mysql/debian.cnf查看,以下完成设置远程访问的权限

1
2
3
4
5
6
use mysql;
select user,Host from user;
update user set Host='%' where user='root';
grant all privileges on *.* to 'root'@'%' identified by '密码' with grant option;
flush privileges;
exit;

重启服务,观察是否正常。

若还是不正常,继续键入cd /etc/mysql/mysql.conf.d查看配置文件是不是正常对外 IP 访问vim 50-server.cnf

发现bind-address 配置项错误,理应改成 0.0.0.0

保存后,重启服务,再观察是否正常。

SVN/Git报错问题汇总

Q: Please execute the ‘Cleanup’ command

下载sqlite3工具,解压缩 sqlite3.exe 程序至仓库根目录,然后 cmd 命令行工具,键入

1
2
sqlite3.exe .svn/wc.db "select * from work_queue" #该命令可以查看当前挂起的svn操作
sqlite3.exe .svn/wc.db "delete from work_queue" #该命令可以删除当前挂起的svn操作

最后重新 cleanup 即可修复

Q: clone 项目的时候git@github.com: Permission denied (publickey)

这个错误通常是因为你没有在本地机器上与 GitHub 账户关联的有效 SSH 密钥,因此无法连接到 GitHub 账户,你需要创建个凭证链接至 Github

有需要提醒你,GitHub 在境内接近 block 状态,你需要些加速手段,如环境变量 http_proxy[ghproxy.com/gitclone.com]或者自有加速$ git config –global http.https://github.com.proxy socks5://127.0.0.1:17890

下面以 Windows 做事例,键入 cmd

ssh-keygen -t rsa -b 4096 -C "your_email@example.com"

按顺序分别输入文件保存路径(默认是 C:\Users.ssh\id_rsa.pub)、密码和确认密码,完成后将 id_rsa.pub 打开,复制所有内容至自己的 GitHub 账户,打开”Settings”页面,选择”SSH and GPG keys”内。

键入 git bash 打开,将生成的密钥添加到 ssh-agent

ssh-add ~/.ssh/id_rsa

最后,检查是否已关联了正确的 SSH 密钥

ssh-add -l

Ubuntu食用相关

Q:执行 yarn install 出错 Yarn install command error No such file or directory: ‘install’

1
2
3
4
5
6
sudo apt remove cmdtest
sudo apt remove yarn
curl -sS https://dl.yarnpkg.com/debian/pubkey.gpg | sudo apt-key add -
echo "deb https://dl.yarnpkg.com/debian/ stable main" | sudo tee /etc/apt/sources.list.d/yarn.list
sudo apt-get update
sudo apt-get install yarn

Q:Debian11 服务器系统默认不存在 sudo 命令的解决办法

1
2
3
4
5
6
7
8
9
10
11
12
13
14
15
apt-get install vim
vim /etc/apt/sources.list

#!编辑注释所有,添加以下
deb http://mirrors.aliyun.com/debian/ bullseye main contrib
deb-src http://mirrors.aliyun.com/debian/ bullseye main contrib
deb http://mirrors.aliyun.com/debian/ bullseye-updates main contrib
deb-src http://mirrors.aliyun.com/debian/ bullseye-updates main contrib
deb http://mirrors.aliyun.com/debian/ bullseye-backports main contrib
deb-src http://mirrors.aliyun.com/debian/ bullseye-backports main contrib
deb http://mirrors.aliyun.com/debian/ bullseye-proposed-updates main contrib
deb-src http://mirrors.aliyun.com/debian/ bullseye-proposed-updates main contrib

apt-get update
apt-get install sudo

Q:安装 Nodejs

1
2
3
4
5
6
curl -sL https://deb.nodesource.com/setup_10.x | sudo -E bash -
sudo apt-get install -y nodejs
node -v

#!卸载如下
sudo apt-get remove nodejs

Q:食用 yum 出现 except KeyboardInterrupt, e:或 except OSError,

1
2
3
4
5
6
7
8
whereis python
#修改yum配置文件,将python版本指向以前的旧版本
# vi /usr/bin/yum
#!/usr/bin/python2.7

#修改urlgrabber-ext-down文件,更改python版本
# vi /usr/libexec/urlgrabber-ext-down
#!/usr/bin/python2.7

内网搭建npm私服Verdaccio

写在前面

因为内外网物理隔离,无法使用 npm 命令安装各种包。

寻求答案,目前以下解决方案可以实现这项业务:

sinopia 已经不再维护,遇到问题可能无渠道解答;

cnpm 的实现略显复杂,可能不适用于轻度个人使用;

因此使用 verdaccio 不过 verdaccio 主要擅长发布私有 package,搭建私服 npm 只是它顺带的技能。

综上所述,正经的搭建 npm 仓库应该选择 cnpm 或 Nexus

部署过程

2.1 安装

因此你需要准备一台能上外网的电脑先部署好环境再回迁到内网即可。

键入npm install -g verdaccio完成安装,当然你得确保你的 nodejs 环境版本大于 12

2.2 配置

安装成功后键入verdaccio即可启动,启动成功查看 log 会声明配置文件存放哪个位置,后结束进程。

Windows:C:\Users\PC\AppData\Roaming\verdaccio\config.yaml
Linux:~/.config/verdaccio/config.yaml

接下来修改配置文件 config.yaml

1
2
3
4
5
6
7
# a list of other known repositories we can talk to
uplinks:
npmjs:
url: https://registry.npm.taobao.org
timeout: 300ms
max_fails: 20
fail_timeout: 10m

即将 verdaccio 的上行链路改为国内 npm 源,设置成功重新键入verdaccio即可。

2.3 set registry

另起一个 bash 终端窗口,设置目前使用源为 vardaccio

1
2
3
4
5
6
7
# npm config
npm config set registry http://localhost:4873/
npm config get registry

# 或 nrm
nrm add localnpm http://localhost:4873/
nrm use localnpm

2.4 正式食用

测试对于现有包的安装是否正常,建立一个空项目,安装 fastclick 这个包食用下。

1
2
3
4
mkdir localnpm
cd localnpm
npm init -y
npm install fastclick

回去查看 verdaccio 进程会发觉:

1
2
3
4
5
6
http --> 304, req: 'GET https://registry.npm.taobao.org/fastclick' (streaming)
http --> 304, req: 'GET https://registry.npm.taobao.org/fastclick', bytes: 0/0
http --> 304, req: 'GET https://registry.npmjs.org/fastclick' (streaming)
http --> 304, req: 'GET https://registry.npmjs.org/fastclick', bytes: 0/0
http <-- 200, user: null(127.0.0.1), req: 'GET /fastclick', bytes: 0/1122

其实它是去了淘宝源下载到本地,然后再从本地拿 fastclick 包,其路径为 npm install -> verdaccio -> taobaonpm

所以 verdaccio 会根据本地缓存情况,自动从淘宝源下载未缓存的包,提供给用户使用。

2.5 缓存结果

Windows:C:\Users\PC\AppData\Roaming\verdaccio\storage
Linux:~/.config/verdaccio/storage/

进一步打开子文件夹可以看到以各个包命名的文件夹,文件夹内包含.tgz 文件和 package.json 文件。其中.tgz 文件,视项目需要可以缓存多个版本,存在即为缓存成功。

2.6 内网迁移

内网没有 npm,是无法安装 verdaccio 的,只能移植。

内网先部署 node 环境,将外网机器的 npm、verdaccio 文件夹打包拷入内网,并放到相同的位置。

如果一切正常,可以在内网运行verdaccio

然后同样将 verdaccio 设为内网 npm 的 registry 最后即成功迁移使用。

接下来每次更新根据~/storage/修改时间降序,把文件夹复制粘贴回内网即可完成更新。

引用

内网搭建 npm 私服——Verdaccio

如何将 Verdaccio 设为服务

使用 verdaccio 搭建私有 npm 仓库及发包

使用 verdaccio 搭建离线库

写在最后

最急用可以考虑键入npm install -g selenium-webdriver从%appdata%\npm\node_modules\selenium-webdriver 下使用npm-pack-all(<font style="color:rgb(0, 0, 0);background-color:rgb(246, 246, 246);">npm install </font><font style="color:rgb(96, 125, 139);background-color:rgb(246, 246, 246);">-</font><font style="color:rgb(0, 0, 0);background-color:rgb(246, 246, 246);">g npm</font><font style="color:rgb(96, 125, 139);background-color:rgb(246, 246, 246);">-</font><font style="color:rgb(0, 0, 0);background-color:rgb(246, 246, 246);">pack</font><font style="color:rgb(96, 125, 139);background-color:rgb(246, 246, 246);">-</font><font style="color:rgb(0, 0, 0);background-color:rgb(246, 246, 246);">all</font>)打包 tgz 到离线环境 install 即可。

图片文件流的转换(url、file、base64、blob、canvas、uint8array)

写在前面

在 JS 中,常见的图片格式有 img 对象 urlfile、file 对象、base64、blob 对象、canvas 对象、uint8array

因为开发业务的需求,需要经常的对文件类型进行转换。

Base64 转 Blob

转化思路:Base64 –> Uint8Array –> new Blob()

1
2
3
4
5
6
7
8
9
10
11
12
13
14
15
16
17
18
19
20
21
/**
* Base64转Blob
* @param base64 String base64格式字符串
* @param contentType String blob对象的文件类型,如:"image/png"
*/
function translateBase64ImgToBlob(base64, contentType) {
var arr = base64.split(","); //去掉base64格式图片的头部
var bstr = atob(arr[1]); //atob()方法将数据解码
var leng = bstr.length;
var u8arr = new Uint8Array(leng);
while (leng--) {
u8arr[leng] = bstr.charCodeAt(leng); //返回指定位置的字符的 Unicode 编码
}
var blob = new Blob([u8arr], { type: contentType });
var blobImg = {};
blobImg.url = URL.createObjectURL(blob); //创建URL,
blobImg.name = new Date().getTime() + ".png";
return blobImg;
}

var base64 = "data:image/png;base64,iVBORw0KGgoAAAANSUhEUgA......q"; //注意base64格式

Base64 转 File

转化思路:base64 –> Uint8Array –> new File()

1
2
3
4
5
6
7
8
9
10
11
12
13
14
15
16
17
18
/**
* Base64转
* @param base64 String base64格式字符串
* @param contentType String file对象的文件类型,如:"image/png"
* @param filename String 文件名称或者文件路径
*/
function translateBase64ImgToFile(base64, filename, contentType) {
var arr = base64.split(","); //去掉base64格式图片的头部
var bstr = atob(arr[1]); //atob()方法将数据解码
var leng = bstr.length;
var u8arr = new Uint8Array(leng);
while (leng--) {
u8arr[leng] = bstr.charCodeAt(leng); //返回指定位置的字符的 Unicode 编码
}
return new File([u8arr], filename, { type: contentType });
}

var base64 = "data:image/png;base64,iVBORw0KGgoAAAANSUhEUgA......q"; //注意base64格式

Blob(File) 转 Base64

转化思路:利用 FileReader 的 readAsDataURL,将 blob 转为 base64

1
2
3
4
5
6
7
8
9
10
11
12
13
/**
* Blob转Base64
* @param base64 String base64格式字符串
* @param callback Function 获取转换结果e.target.result后执行的回调函数
*/
function translateBlobToBase64(blob, callback) {
var reader = new FileReader();
reader.onload = function (e) {
callback(e.target.result);
};
reader.readAsDataURL(blob);
//读取后,result属性中将包含一个data:URL格式的Base64字符串用来表示所读取的文件
}

canvas 转 Base64

转化思路:利用 HTMLCanvasElement 的 API .toDataURL() 返回一个包含图片展示的 data URL ,默认格式为 png

1
2
3
4
5
6
$("#confirm").on("click", function () {
var img_canvas = document.getElementsByTagName("canvas");
var base64URL = img_canvas.toDataURL("image/png");
$(".canvas").html(``);
});
// 利用URL.createObjectURL可以转为blob

Uint8Array 转 Base64

转化思路:利用 ascii 编码重新 self.btoa

1
2
3
4
5
6
7
8
/**
* uint8array转Base64
* @param callback Function 获取转换结果e.target.result后执行的回调函数
*/
function translateU8ToBase64(u8, callback) {
var ascii = new Uint8Array(u8);
var base64encoded = btoa(String.fromCharCode.apply(null, ascii));
}

写在后面

什么是 Base64

base64 是一种用 64 个可打印字符编码任意二进制的方法。所谓 Base64,就是说选出 64 个字符,小写字母 a-z、大写字母 A-Z、数字 0-9、符号”+”、”/“(再加上作为垫字的”=”,实际上是 65 个字符)作为一个基本字符集。然后,其他所有符号都转换成这个字符集中的字符。

具体来说,转换方式可以分为四步。第 1 步,将每三个字节作为一组,一共是 24 个二进制位。第 2 步,将这 24 个二进制位分为四组,每个组有 6 个二进制位。第 3 步,在每组前面加两个 00,扩展成 32 个二进制位,即四个字节。

根据下表,得到扩展后的每个字节的对应符号,这就是 Base64 的编码值。

什么是 Uint8Array

Uint8Array 数组类型表示一个 8 位无符号整型数组,创建时内容被初始化为 0。创建完后,可以以对象的方式或使用数组下标索引的方式引用数组中的元素。

https://developer.mozilla.org/zh-CN/docs/Web/JavaScript/Reference/Global_Objects/Uint8Array

什么是 File 对象

HTML5 在 DOM 中为文件输入元素添加了一个 files 集合。在通过文件输入字段选择了一或多个文件时,files 集合中将包含一组 File 对象,每个 File 对象对应着一个文件。每个 File 对象都有下列只读属性,分别是

name: 本地文件系统中的文件名

size: 文件的字节大小

type: 字符串

MIME: 文件类型

lastModifiedDate: 文件上一次被修改的时间

https://developer.mozilla.org/zh-CN/docs/Web/API/File

文本批量安全翻译

翻译简介

简要描述

  • 支持大文本翻译与文件翻译处理;
  • 支持 15 家翻译服务商对比翻译;
  • 自动判别各种语种并翻译,100 万之内免费调用

请求 URL

https://api.catooilg.com/dataspace/tasks/xtranslate

请求方式

  • POST

统一接口请求 Token:https://api.catooilg.com/dataspace/tasks/getToken GET

Header 必选 类型 说明
accessToken 是 String Token 鉴权,有效期为 3600sec

请求参数

参数名 必选 类型 说明
canvasId 是 Number 翻译服务商,具体如下
1: 彩云翻译
2: 小牛翻译
3: Youdao
4: Yandex(终止服务)
5: Sougou(终止服务)
6: Baidu
7: Microsoft Azure 8: Aliyun
9: Tencent
10: IBM(终止服务)
11: Amazon
12: Google
13: 同花顺
14: 火山引擎
15: Deepl
source 是 String 待翻译的文本
file 否 File 待翻译的文件(仅支持 TXT 文件)

返回示例

{ “msg”: “success”, “code”: 200, “ResultObj”: { “isdict”: 0, “rc”: 0, “confidence”: 0.8, “target”: “这种屠杀是毫无意义的,因为它不能影响战争的结果。桑儿是一个杰出的战术家,穿着他辉煌的胜利服装。但我们需要的是堂-科利昂的战略天才。整个事件堕落成这样一场致命的游击战,双方都发现自己失去了大量的收入和生活毫无意义。柯里昂家族最终被迫关闭了一些最赚钱的赌马站,其中包括送给女婿卡洛 · 里奇谋生的那本书。卡罗和合唱团的姑娘们一起喝酒,跑来跑去,使他的妻子康妮很为难。自从他被桑儿打了以后,他就不敢再打他的妻子了,但是他没有和她睡觉。康妮扑倒在他的脚下,他象罗马人一样,带着高雅的贵族的喜悦,拒绝了她。他嘲笑她说: “去给你哥哥打电话,告诉他我不会欺负你,也许他会打我,直到我硬起来。”” } }

返回参数说明

参数名 类型 说明
msg String 错误信息
code String 错误代码
ResultObj String 返回结果

自申接口设置

1 - 彩云小译

登陆/注册彩云小译

开通彩云小译 API,填写资料妥当人工审核 1-2 天获取 token 即可。

对接文档:

仅供参考,请以翻译供应商最新官方文档为准。

https://open.caiyunapp.com/五分钟学会彩云小译_API

收费相关:

每月翻译 100 万字之内都是免费的,如果您每月超过 100 万字,我们会按照 20 元 / 100 万字 的费率收费。

翻译入参:

统一接口请求域名:http://api.interpreter.caiyunai.com/v1/translator POST

参数名称 类型 描述
token String 通过后获得的翻译权杖 token
测试 token:3975l6lr5pcbvidl6jl2
Source String 待翻译的文本列表
trans_type String 匹配源语种
en2zh: 英文 -> 中文
ja2zh: 日文 -> 中文
zh2en: 中文 -> 英文
zh2ja: 中文 -> 日文

附:

在线调用


2 - 小牛翻译云

登陆/注册小牛翻译云

打开控制台,点击个人中心即可获得 API_KEY

对接文档:

仅供参考,请以翻译供应商最新官方文档为准。

https://niutrans.com/documents/contents/trans_text#accessMode

收费相关:

每月 100 万字符免费额度,超过 100 万字符,不购买流量包则按照 59 元/百万字符支付当月超出部分字符量费用,流量包价格梯度有 500/2000/3000 元分别对应 1000 万/5000 万/10000 万字符,不可自定义。

注意,目前小牛完成升级 V7.0 版本,将关闭免费 API 服务,老用户可继续使用免费接口至 2021 年 12 月 31 日,具体规则浏览官网。

新增公众号打卡获取流量规则:

当月连续签到 1 天 3 天 7 天 14 天 30 天
获得字符流量 10 万 50 万 100 万 500 万 1000 万

翻译入参:

统一接口请求域名:https://api.niutrans.com/NiuTransServer/translation POST/GET

对接文档:https://niutrans.com/documents/contents/trans_text#accessMode

参数名称 类型 描述
apikey String API 密钥
from String 文本翻译支持 299 种语言两两互译,具体代码查看
to String 无匹配源语种,支持两两互翻译
src_text 待翻译的文本(UTF-8 编码)

附:

在线调用


3 - 有道翻译

登陆/注册有道智云(网易云)

创建应用,在创建选择接入方式为 API,然后创建实例,在自然语言翻译服务下文本翻译创建,绑定刚刚创建的应用,即可获得“应用 ID” 和 “应用密钥”。

对接文档:

仅供参考,请以翻译供应商最新官方文档为准。

https://ai.youdao.com/doc.s#guide

收费相关:

注册赠送 50 现金,中文与常见语种(越南语、英语、印度尼西亚语、意大利语、西班牙语、日语、葡萄牙语、韩语、法语、俄语、德语、阿拉伯语、泰语)互译 48 元/100 万字符,使用即扣费,中文与非常见语种互译 100 元/100 万字符。

翻译入参:

统一接口请求域名:https://openapi.youdao.com/api POST

参数名称 类型 描述
appKey String 百度开发者信息的 APP ID
salt String random 随机数,可 UUID
signType String v3
curtime String 当前 UTC 时间戳,如何在不同编程语言中获取现在的 Unix 时间戳(Unix timestamp)
from String 文本翻译支持 111 种语言两两互译,具体代码查看
常见语种如下:
en:英语
vi:越南语
id:印度尼西亚语
it:意大利语
es:西班牙语
ja:日语
pt:葡萄牙语
ko:韩语
fr:法语
ru:俄语
de:德语
ar:阿拉伯语
to String 无匹配源语种,支持两两互翻译
sign String 签名,sha256(应用 ID+input+salt+curtime+应用密钥,其中,input 的计算方式为:input=q 前 10 个字符 + q 长度 + q 后 10 个字符(当 q 长度大于 20)或 input=q 字符串(当 q 长度小于等于 20))
q 待翻译的文本(UTF-8 编码)

附:

在线调用


4 - Yandex

登陆/注册Yandex(和邮箱服务互通)

进入打开 Developers 进入个人开发者信息,创建 API keys -> Create a new Key 即可获得 API Keys

对接文档:

仅供参考,请以翻译供应商最新官方文档为准。

https://yandex.com/dev/translate/doc/dg/reference/translate.html

收费相关:

俄罗斯翻译商,全程收费,按 15USD/100 万字符计算。

具体收费标准请查看:https://translate.yandex.com/developers/prices

附:

在线调用


5 - 搜狗翻译(已下线)

登陆/注册搜狗深智引擎(不与搜狗输入法互通)

选择机器翻译 -> 文本翻译,点击获取 PID&KEY

收费相关:

注册赠送 100 现金,中文与常见语种互译 40 元/100 万字符,中文与非常见语种互译 60 元/100 万字符。

翻译入参:

统一接口请求域名:http://fanyi.sogou.com/reventondc/api/sogouTranslate POST

对接文档:https://deepi.sogou.com/doccenter/texttranslatedoc?fr=process

参数名称 类型 描述
pid String 服务 id
salt String random 随机数,可 UUID
from String 文本翻译支持 61 种语言两两互译,具体代码查看
常见语种如下:
zh-CHS:中文
en:英语
ja:日语
ko:韩语
fr:法语
de:德语
ru:俄语
es:西班牙语
ar:阿拉伯语
it:意大利语
pt:葡萄牙语
cs:捷克语
pl:波兰语
hu:匈牙利语
nl:荷兰语
sv:瑞典语
da:丹麦语
fi:芬兰语
tr:土耳其语
vi:越南语 se
th:泰语
to String 无匹配源语种,支持两两互翻译
sign String 签名,md5(pid+q+salt+用户密钥),其中 pid、q、salt、用户密钥参数去除了首尾空格
q 待翻译的文本(UTF-8 编码)

附:

在线调用


6 - 百度翻译

登陆/注册百度

开通通用翻译 API,资料填写,秒批审核即获得开发者信息(APP ID 以及 密钥)

对接文档:

仅供参考,请以翻译供应商最新官方文档为准。

https://fanyi-api.baidu.com/product/11

收费相关:

每月 200 万字符免费额度,超过 200 万字符,按照 49 元/百万字符支付当月超出部分字符量费用。

区分标准版、高级版和尊享版,之间区别在于 QPS(每秒请求数)翻译速度。

翻译入参:

统一接口请求域名:https://fanyi-api.baidu.com/api/trans/vip/translate POST

参数名称 类型 描述
appid String 百度开发者信息的 APP ID
salt String random 随机数,可 UUID
from String 文本翻译支持 201 种语言两两互译,具体代码查看
基础语种如下:
zh:简体中文
cht:繁体中文 en:英语 de:德语 jp:日语 kor:韩语 fra:法语 spa:西班牙语 th:泰语 ara:阿拉伯语 ru:俄语 pt:葡萄牙语 it:意大利语 el:希腊语 nl:荷兰语 pl:波兰语 bul:保加利亚语 est:爱沙尼亚语 dan:丹麦语
fin:芬兰语
cs:捷克语
rom:罗马尼亚语
slo:斯洛文尼亚语
swe:瑞典语
hu:匈牙利语
vie:越南语
to String 无匹配源语种,支持两两互翻译
sign String 签名,appid+q+salt+密钥的 MD5 值(需要生成的签名长度为 32 位 MD5 码,签名中的英文字符均为小写格式,且注意去空格)
q 待翻译的文本(UTF-8 编码)

附:

在线调用


7 - Microsoft Azure

登陆/注册Microsoft Azure

My account -> Azure Portal -> Create a resource 添加 Translator Text

建立 Translator Text 有一点需要注意,Region 需要选择 Global(全域),订阅账号默认 Pay-As-You-Go 即可。

开通后获取 Keys and Endpoint(金轮和端点)其中 Key1 就是请求需要的。

收费相关:

每月免费 200 万个字符,超出按 10USD/100 万字符计算。

具体收费标准请查看:https://azure.microsoft.com/zh-cn/pricing/details/cognitive-services/translator/

接入的是文字翻译,而非文件翻译。

翻译入参:

对接文档:https://docs.microsoft.com/zh-tw/azure/cognitive-services/translator/quickstart-translator?WT.mc_id=Portal-Microsoft_Azure_ProjectOxford&tabs=csharp

支持语种:https://docs.microsoft.com/zh-tw/azure/cognitive-services/translator/language-support


8 - 阿里云翻译

登陆/注册阿里云

启用机器翻译的 API,看到需购买资源包通用翻译引擎即开通成功。

惯例点击 RAM 访问控制配置一个子账户,授权拥有机器翻译的所有权限,然后获取子账户的 AccessKey ID 和 AccessKey Secret.查阅如何授权子账户。

对接文档:

仅供参考,请以翻译供应商最新官方文档为准。

https://help.aliyun.com/document_detail/158244.html

收费相关:

注意区分通用版与专业版,均为每月 100 万字符免费额度,超出则按通用 50 元/100 万,专业 60 元/100 万字符收费,接受资源包套餐,且可自定义资源包字符量。

建议使用通用版翻译引擎,这里不指向文档翻译。

翻译入参:

参数名称 类型 描述
accessKeyId String 阿里云账号的 AccessKey ID
accessKeySecret String 阿里云账号 Access Key Secret
SourceLanguage String 文本翻译支持 214 种语言两两互译,具体代码查看
基础语种如下:
zh:简体中文 en:英语 ja:日语 ko:韩语 es:西班牙语 fr:法语 pt:葡萄牙语 it:意大利语 ru:俄语 ar:阿拉伯语 tr:土耳其语 th:泰语 id:印尼语 vi:越南语 ms:马来语 he:希伯来语 hi:印地语 pi:波兰语
ni:荷兰语
de:德语
TargetLanguage String 无匹配源语种,支持两两互翻译
Scene String general
SourceText 待翻译的文本

附:

在线调用


9 - 腾讯翻译君

登陆/注册腾讯云

启用机器翻译 TMT 的 API,于控制台看到文本翻译数据中台即开通成功。

由于调用 API 翻译使用的不是独立的 Secret 和 token 为了安全起见建议自己去 RAM 开设多一个子账户,仅授权使用该翻译 API 其设置路径为访问管理 -> 用户 -> 用户列表

对接文档:

仅供参考,请以翻译供应商最新官方文档为准。

https://cloud.tencent.com/document/product/551


收费相关:

文本翻译的每月免费额度为 500 万字符,免费额度每月 1 日 0 点重置,如果 500 万-10000 万收费 58 元/每 100 万字符,如果大于 10000 万则收费 50 元/每 100 万字符。(1 个汉字、1 个字母、1 个标点或空格都计为 1 个字符)

附:

在线调用


10 - IBM

登陆/注册IBM

服务全称名为:IBM Watson Language Translator,进入 IBM Cloud 控制台,开通 Language Lite 服务,即可在面板看到金轮 Key

对接文档:

仅供参考,请以翻译供应商最新官方文档为准。

https://cloud.ibm.com/apidocs/language-translator#listlanguages

收费相关:

每月免费 100 万个字符,超出按 20USD/100 万字符计算。

具体收费标准请查看:https://www.ibm.com/cn-zh/cloud/watson-language-translator/pricing

附:

在线调用


11 - Google

登陆/注册Google

先在 Header 头部搜索框搜索 Cloud Translation API 启用该 API,然后获取 API Key 即可。

【目前注册 Google 不可使用国内手机号码,请使用 Email 注册】

对接文档:

仅供参考,请以翻译供应商最新官方文档为准。

https://cloud.google.com/translate/docs/advanced/quickstart?hl=zh_CN

收费相关:

基于 Cloud Translation 基本版 (v2)每月 50 万字符,使用的是 10USD 赠金抵扣,超出按 20USD/100 万字符计算

具体收费标准请查看:https://cloud.google.com/translate/pricing?hl=zh-cn

附:

在线调用


12 - Amazon AWS

登陆/注册Amazon(不与国内亚马逊账号互通)

登陆后选择 IAM,创建一个使用者授权含翻译所有权限(TranslateFullAccess、AmazonElasticTranscoder_FullAccess、AmazonTranscribeFullAccess、AWSTransferLoggingAccess、AmazonElasticTranscoder_JobsSubmitter、AWSTransferFullAccess、 AWSTransferConsoleFullAccess)最后拿到 Access Key 和 Secret

注意另存为 csv 文件,一次性显示。

【目前注册账号需要双币信用卡】

对接文档:

仅供参考,请以翻译供应商最新官方文档为准。

https://docs.aws.amazon.com/zh_cn/translate/latest/dg/examples-java.html

支持语种:https://cloud.ibm.com/docs/language-translator?topic=language-translator-translation-models

收费相关:

每月免费 200 万个字符(严格遵循 Free Tier)超过则按 15USD/100 万字符收费。

具体收费标准请查看:https://aws.amazon.com/cn/translate/pricing/?nc1=h_ls

附:

在线调用


13 - 同花顺

登陆/注册同花顺 AI 开放平台个人开发者账号

创建应用,填写应用名称以及应用描述,开通机器翻译下文本翻译获取 Appid 和 AppKey 即可完成创建。

对接文档:

仅供参考,请以翻译供应商最新官方文档为准。

http://www.aicubes.cn/api/public/docCenter.html#source=machineTranslationDoc

收费相关:

限时免费,收费另作公告。

附:

在线调用


14 - 火山引擎

登陆/注册火山账号(与头条/抖音互通)

使用银行卡号和身份证号完成实名认证,开通机器翻译,使用访问控制新增用户分配子账号关联翻译策略(TranslateFullAccess 和 I18nTranslateFullAccess)即可。

对接文档:

仅供参考,请以翻译供应商最新官方文档为准。

https://www.volcengine.com/docs/4640/65067

收费相关:

每月免费 200 万个字符,免费额度每月 1 日 0 点重置,超出按 49 元/100 万字符计算。

具体收费标准请查看:https://www.volcengine.com/docs/4640/68515

附:

在线调用


译云

登陆/注册译云

登陆个人中心即可获得 APP ID 以及密钥。

【目前暂停申请接入译云机器翻译开放 API】

收费相关:

申报学术用途,免费。

每小时 1000 次免费访问,超过访问次数后会进行封禁暂停服务,1 小时后会自然恢复。

翻译入参:

统一接口请求域名:http://api.yeekit.com/dotranslate.php POST

对接文档:https://api.yeekit.com/mannual.php#docs

参数名称 类型 描述
app_kid String 授权 APP ID
app_key String 授权 APP KEY(密钥)
from String 只开放英语和中文的翻译,其他芬兰语等语种邮箱联系support@yeekit.com开通
zh:中文简体
en:英文
to String 同上
text 待翻译的文本(UTF-8 编码)

附:

在线调用

人工翻译


Deepl

登陆/注册Deepl

注意注册需要欧洲信用卡,且选择角色为 DeepL API Free

示例 Demo:

1
2
3
4
5
6
7
8
9
10
11
12
13
14
15
16
17
18
19
20
21
22
23
24
25
26
27
28
29
30
31
32
33
34
35
36
37
38
39
40
41
42
43
44
45
46
47
48
49
50
51
52
53
54
55
56
57
58
59
60
61
62
63
64
65
66
67
68
69
70
71
72
73
74
75
76
77
from enum import Enum, auto as auto_rename
import requests

DEEPL_API = "https://deepl.vercel.app/translate"


class TranslateError(Exception):
pass


class ParamInvalidError(TranslateError):
pass


class AutoName(Enum):
def _generate_next_value_(name, start, count, last_values):
return name


class Lang(AutoName):
auto = auto_rename()
DE = auto_rename()
EN = auto_rename()
ES = auto_rename()
FR = auto_rename()
IT = auto_rename()
JA = auto_rename()
NL = auto_rename()
PL = auto_rename()
PT = auto_rename()
RU = auto_rename()
ZH = auto_rename()
BG = auto_rename()
CS = auto_rename()
DA = auto_rename()
EL = auto_rename()
ET = auto_rename()
FI = auto_rename()
HU = auto_rename()
LT = auto_rename()
LV = auto_rename()
RO = auto_rename()
SK = auto_rename()
SL = auto_rename()
SV = auto_rename()


def prepare_for_serialization(obj: dict):
serialized_dict = dict()
for k, v in obj.items():
serialized_dict[k] = v.name if isinstance(v, Enum) else v
return serialized_dict


def translate(text: str, target_lang: Lang, source_lang: Lang):
if target_lang is Lang.auto:
raise ParamInvalidError
resp = requests.post(
DEEPL_API,
json=prepare_for_serialization({
"text": text,
"target_lang": target_lang,
"source_lang": source_lang
})
)
if resp.status_code != 200:
raise TranslateError
result = resp.json()
return result


if __name__ == '__main__':
print(translate(
text="Hello World!",
source_lang=Lang.auto,
target_lang=Lang.ZH
))

附:

在线调用


免责声明及其他

收费一览,如表所示。

名字 类型 QPS 具体价格 备注
1.彩云小译 免费+收费 20RMB/100 万字符 免费额度 100 万/月
2.小牛翻译云 收费 50(5k) 59RMB/100 万字符 打卡额度
3.有道翻译 收费 (5k) 48&100RMB/100 万字符 50 元现金注册赠送
4.Yandex 收费 15USD/100 万字符 全程收费
5.搜狗 收费 50 40&60RMB/100 万字符 100 元现金注册赠送
6.百度 免费+收费 1 49USD/100 万字符 免费额度 200 万/月
7.Microsoft Azure 免费+收费 10USD/100 万字符 免费额度 200 万/月
8.阿里云 免费+收费 50(5k) 50RMB/100 万字符 免费额度 100 万/月
9.腾讯云 免费+收费 5(2k) 58RMB/100 万字符 免费额度 500 万/月
10.IBM 免费+收费 20USD/100 万字符 免费额度 100 万/月
11.Google 免费+收费 20USD/100 万字符 免费额度 50 万/月(赠金)
12.Amazon AWS 免费+收费 15USD/100 万字符 免费额度 200 万/月
13.同花顺 免费 (5k) 免费
14.火山引擎 免费+收费 (5k) 49RMB/100 万字符 免费额度 200 万/月
15.Deepl 收费 需欧洲属地信用卡开通
16.译云 免费 免费

VScode remote ssh 异常相关

remote host key has changed port forwarding is disabled

点击下方终端机查看详情

1
2
3
4
5
6
7
8
9
10
11
12
13
14
$ ssh ec2-user@ec2-192-168-1-1.compute-1.amazonaws.com
@@@@@@@@@@@@@@@@@@@@@@@@@@@@@@@@@@@@@@@@@@@@@@@@@@@@@@@@@@@
@ WARNING: REMOTE HOST IDENTIFICATION HAS CHANGED! @
@@@@@@@@@@@@@@@@@@@@@@@@@@@@@@@@@@@@@@@@@@@@@@@@@@@@@@@@@@@
IT IS POSSIBLE THAT SOMEONE IS DOING SOMETHING NASTY!
Someone could be eavesdropping on you right now (man-in-the-middle attack)!
It is also possible that a host key has just been changed.
The fingerprint for the ECDSA key sent by the remote host is
SHA256:hotsxb/qVi1/ycUU2wXF6mfGH++Yk7WYZv0r+tIhg4I.
Please contact your system administrator.
Add correct host key in /Users/scott/.ssh/known_hosts to get rid of this message.
Offending ECDSA key in /Users/scott/.ssh/known_hosts:47
ECDSA host key for ec2-192-168-1-1.compute-1.amazonaws.com has changed and you have requested strict checking.
Host key verification failed.

即可发现问题出现在.ssh/known_hosts,这便是 macOS 的存根路径,打开访达,前往文件夹,编辑删除对应 IP 即可。

初尝vue+html5plus+hbuilder

html5plus 是 vuejs 原生拓展插件,其具体特性可以在官方文档中查询。

以调用 camera 摄像头以及 io 读取 pdf 文件展示 html5+原生能力

IO 流

IO 模块管理本地文件系统,用于对文件系统的目录浏览、文件的读取、文件的写入等操作。通过 plus.io 可获取文件系统管理对象。

实现方法为 plus.io -> document -> 使用 pdf 插件在线预览、缩放和翻页/使用第三方应用(WPS\office)打开

初始化

安装库

cnpm i vue-awesome-mui -S

引入

1
import Mui from 'vue-awesome-mui' Vue.config.productionTip = false Vue.use(Mui)

plus.openFile

调用第三方程序打开 pdf 文件

1
2
3
4
5
6
7
8
9
10
11
12
13
14
15
16
17
18
19
20
21
22
23
24
25
26
<script>
openFile() {
let files = [];
// 获取目标路径下的所有文件以及子目录,此处以PRIVATE_WWW为例
plus.io.requestFileSystem(plus.io.PRIVATE_WWW,entry=>{
// 同理删除操作为 plus.io.resolveLocalFileSystemURL
let directoryReader = entry.root.createReader();
directoryReader.readEntries(fs=>{
for(let i=0;i<fs.length;i++){
if(fs[i].isFile){
files.push({
name:fs[i].name,
fullPath:fs[i].fullPath,
url:fs[i].toURL()
})
}
}
plus.runtime.openFile(files[0].url);
},e=>{
Dialog({ message: '调用失败: ' + e.message })
})
},e=>{
Dialog({ message: '调用失败: ' + e.message })
})
}
</script>

使用第三方成熟可靠的应用,可以大大节省我们的开发的时间,不过通常我们会遇到 ios 手机不能下载文件的问题,那是因为苹果手机的拦截机制,这时我们只能通过别的方法来解决问题。

vue-pdf 插件

官方文档

初始化

npm install --save vue-pdf

引入

import pdf from ‘vue-pdf’

具体实现

1
2
3
4
5
6
7
8
9
10
11
12
13
14
15
16
17
18
19
20
21
22
23
24
25
26
27
28
29
30
31
32
33
34
35
36
37
38
39
40
41
42
43
44
45
46
47
48
49
50
51
52
53
54
55
56
57
58
59
60
61
62
63
64
65
66
67
68
69
70
71
72
73
74
75
76
77
78
79
80
81
82
83
84
85
86
87
88
89
90
91
92
93
94
95
96
97
98
99
100
101
102
103
104
105
106
107
108
109
110
111
112
113
114
115
116
117
118
119
120
121
122
123
124
125
126
127
128
129
130
131
132
133
<template>
<div class="pdf">
<div class="pdf-tab">
<div class="btn-def btn-pre" @click.stop="prePage">上一页</div>
<div class="btn-def btn-next" @click.stop="nextPage">下一页</div>
</div>
<div>{{ pageNum }}/{{ pageTotalNum }}</div>
<pdf
id="pdfPreview"
ref="pdf"
:src="pdfUrl"
:page="pageNum"
:rotate="pageRotate"
@progress="loadedRatio = $event"
@page-loaded="pageLoaded($event)"
@num-pages="pageTotalNum = $event"
@error="pdfError($event)"
@link-clicked="page = $event"
>
</pdf>
</div>
</template>

<script>
import pdf from "vue-pdf";

export default {
name: "demo1",
data() {
return {
leader_code: this.$route.query.act,
pdfUrl: "", // pdf文件地址
pageNum: 1,
pageRotate: 0,
loadedRatio: 0,
curPageNum: 0,
};
},
components: {
pdf,
},
created() {
// 扩展API是否准备好,监听“plusready"事件
if (window.plus) {
this.plusReady();
} else {
document.addEventListener("plusready", this.plusReady, false);
}
},
mounted() {
this.getFile();
},
methods: {
onClickLeft() {
this.$router.go(-1);
},
// 扩展API准备完成后要执行的操作
plusReady() {
var ws = plus.webview.currentWebview(); // 可输出plus.webview
console.log("plus is ready");
},
getFile() {
let files = [];
plus.io.requestFileSystem(
plus.io.PRIVATE_DOC,
(entry) => {
let directoryReader = entry.root.createReader();
directoryReader.readEntries(
(fs) => {
for (let i = 0; i < fs.length; i++) {
if (fs[i].isFile) {
files.push({
name: fs[i].name,
fullPath: fs[i].fullPath,
url: fs[i].toURL(),
});
}
}
this.pdfUrl = pdf.createLoadingTask(files[0].fullPath);
},
(e) => {
Dialog({ message: "调用失败: " + e.message });
}
);
},
(e) => {
Dialog({ message: "调用失败: " + e.message });
}
);
},
pageLoaded(e) {
this.curPageNum = e;
},
prePage() {
let p = this.pageNum;
p = p > 1 ? p - 1 : this.pageTotalNum;
this.pageNum = p;
},
nextPage() {
let p = this.pageNum;
p = p < this.pageTotalNum ? p + 1 : 1;
this.pageNum = p;
},
pdfError(error) {
console.log(error);
},
},
};
</script>

<style scoped>
.pdf-tab {
display: -ms-flexbox;
display: flex;
-ms-flex-wrap: wrap;
flex-wrap: wrap;
padding: 0 0.4rem;
-ms-flex-pack: justify;
justify-content: space-between;
}

.pdf-tab .btn-def {
border-radius: 0.2rem;
font-size: 0.98rem;
height: 1.93333rem;
width: 6.4rem;
text-align: center;
line-height: 1.93333rem;
background: #409eff;
color: #fff;
margin-bottom: 1.26667rem;
}
</style>

进一步可以改造升级,使用AlloyFinger 手势库,让 pdf 实现手势缩放和移动

1
2
import AlloyFinger from 'alloyfinger' import AlloyFingerPlugin from
'alloyfinger/vue/alloy_finger_vue' Vue.use(AlloyFingerPlugin,{ AlloyFinger })

单页配置,具体查看官方 demo详情

1
2
3
4
5
6
7
8
9
10
11
12
13
<template>
<div class="any-scroll-view">
<div ref="body" :style="bodyStyle">
<!-- 滚动区域 -->
</div>
</div>
</template>
... ... ...
<script>
import AlloyFinger from "@/assets/js/alloyfinger.js";
import transform from "@/assets/js/transform.js";
import To from "@/assets/js/to.js";
</script>

pdfjs 插件

如果说 vue-pdf 比较繁杂,不能滚动翻页,只能手动触发翻页,可以考虑由火狐浏览器的 pdfjs

它的优点体现在,更好的跨域解决方案,自带手势库

缺点,经常更新,容易不兼容

官方文档 1

官方文档 2

初始化

<font style="color:rgb(64, 64, 64);">npm install pdfjs-dist --save</font>

这里安装版本号为 v2.7.570

具体实现

1
2
3
4
5
6
7
8
9
10
11
12
13
14
15
16
17
18
19
20
21
22
23
24
25
26
27
28
29
30
31
32
33
34
35
36
37
38
39
40
41
42
43
44
45
46
47
48
49
50
51
52
53
54
55
56
57
58
59
60
61
62
63
64
65
66
67
68
69
70
71
72
73
74
75
76
77
78
79
80
81
82
83
84
85
86
87
88
89
90
91
92
93
94
95
96
97
98
99
100
101
102
103
104
105
106
107
108
109
110
111
112
113
114
115
116
117
118
119
120
121
122
123
124
125
126
127
128
129
130
131
132
133
134
135
136
137
138
139
140
141
142
143
144
145
146
147
148
149
150
151
152
153
154
155
156
157
158
159
160
161
162
163
164
165
166
167
168
169
170
171
172
173
174
175
176
177
178
179
180
181
182
183
184
185
<template>
<div class="container">
<div class="pdf_wrap">
<div class="pdf_down">
<div class="pdf_set_left" @click="scaleD()">放大</div>
<div class="pdf_set_middle" @click="scaleX()">缩小</div>
</div>
<div :style="{ width: pdf_div_width, margin: '0 auto' }">
<canvas
v-for="page in pdf_pages"
:id="'the-canvas' + page"
:key="page"
></canvas>
</div>
</div>
</div>
</template>

<script>
import PDFJS from "pdfjs-dist";
PDFJS.GlobalWorkerOptions.workerSrc = "pdfjs-dist/build/pdf.worker.js";

export default {
name: "demo2",
data() {
return {
leader_code: this.$route.query.act,
pdf_scale: 1.0, //放大系数
pdf_pages: [],
pdf_div_width: "",
pdf_src: null,
};
},
created() {
if (window.plus) {
this.plusReady();
} else {
document.addEventListener("plusready", this.plusReady, false);
}
},
mounted() {
this.getFile();
},
methods: {
onClickLeft() {
this.$router.go(-1);
},
plusReady() {
var ws = plus.webview.currentWebview();
console.log("hello plus");
},
getFile() {
let files = [];
plus.io.requestFileSystem(
plus.io.PRIVATE_WWW,
(entry) => {
let directoryReader = entry.root.createReader();
directoryReader.readEntries(
(fs) => {
for (let i = 0; i < fs.length; i++) {
if (fs[i].isFile) {
files.push({
name: fs[i].name,
fullPath: fs[i].fullPath,
url: fs[i].toURL(),
});
}
}
this.pdf_src = files[0].fullPath;
this._loadFile(this.pdf_src);
},
(e) => {
Dialog({ message: "调用失败: " + e.message });
}
);
},
(e) => {
Dialog({ message: "调用失败: " + e.message });
}
);
},
scaleD() {
//放大
let max = 0;
if (window.screen.width > 1440) {
max = 1.4;
} else {
max = 1.2;
}
if (this.pdf_scale >= max) {
return;
}
this.pdf_scale = this.pdf_scale + 0.1;
this._loadFile(this.pdf_src);
},
scaleX() {
//缩小
let min = 1.0;
if (this.pdf_scale <= min) {
return;
}
this.pdf_scale = this.pdf_scale - 0.1;
this._loadFile(this.pdf_src);
},
_loadFile(url) {
//初始化pdf
let loadingTask = PDFJS.getDocument(url);
loadingTask.promise.then((pdf) => {
this.pdfDoc = pdf;
this.pdf_pages = this.pdfDoc.numPages;
//debugger
this.$nextTick(() => {
this._renderPage(1);
});
});
},
_renderPage(num) {
//渲染pdf页
const that = this;
this.pdfDoc.getPage(num).then((page) => {
let canvas = document.getElementById("the_canvas" + num);
let ctx = canvas.getContext("2d");
let dpr = window.devicePixelRatio || 1;
let bsr =
ctx.webkitBackingStorePixelRatio ||
ctx.mozBackingStorePixelRatio ||
ctx.msBackingStorePixelRatio ||
ctx.oBackingStorePixelRatio ||
ctx.backingStorePixelRatio ||
1;
let ratio = dpr / bsr;
let viewport = page.getViewport({ scale: this.pdf_scale });
canvas.width = viewport.width * ratio;
canvas.height = viewport.height * ratio;
canvas.style.width = viewport.width + "px";
that.pdf_div_width = viewport.width + "px";
canvas.style.height = viewport.height + "px";
ctx.setTransform(ratio, 0, 0, ratio, 0, 0);
let renderContext = {
canvasContext: ctx,
viewport: viewport,
};
page.render(renderContext);
if (this.pdf_pages > num) {
this._renderPage(num + 1);
}
});
},
},
};
</script>

<style lang="scss" scoped>
.pdf_wrap {
width: 100%;
height: 100%;
.pdf_down {
position: fixed;
display: flex;
z-index: 20;
right: 26px;
bottom: 7%;
.pdf_set_left {
width: 30px;
height: 40px;
color: #408fff;
font-size: 11px;
padding-top: 25px;
text-align: center;
margin-right: 5px;
cursor: pointer;
}
.pdf_set_middle {
width: 30px;
height: 40px;
color: #408fff;
font-size: 11px;
padding-top: 25px;
text-align: center;
margin-right: 5px;
cursor: pointer;
}
}
}
</style>

可以观察到,其实pdfjs 是把 pdf 文件渲染成 canvas,所以 vue 加载完 dom 后,要用 nexttick 调用渲染 pdf 函数,值得注意的是 vue-pdf 和 pdfjs 同时 import 会引起冲突问题。

pdfh5 插件

其优点体现在:

1.需要展示的 pdf 文件内容需要每一页上下排列;

2.需要展示用户跟第三方进行电子签名后的合同时,vue-pdf 会屏蔽签名图层,导致合同缺失第三方的电子签名;

3.需要更加轻量化

官方文档

初始化

<font style="color:rgb(77, 77, 77);">cnpm install pdfh5</font>

具体实现

1
2
3
4
5
6
7
8
9
10
11
12
13
14
15
16
17
18
19
20
21
22
23
24
25
26
27
28
29
30
31
32
33
34
35
36
37
38
39
40
41
42
43
44
45
46
47
48
49
50
51
52
53
54
55
56
57
58
59
60
61
62
63
64
65
66
67
68
69
70
71
72
73
74
75
76
77
78
79
80
81
82
83
84
85
86
87
88
89
90
91
92
93
94
95
96
97
98
99
100
101
102
103
104
<template>
<div class="container">
<div class="outBox">
<div id="demo"></div>
</div>
</div>
</template>

<script>
import { Dialog } from "vant";
import Pdfh5 from "pdfh5";
import "pdfh5/css/pdfh5.css";

export default {
name: "demo3",
data() {
return {
leader_code: this.$route.query.act,
pdfh5: null,
};
},
beforeRouteLeave(to, from, next) {
to.meta.keepAlive = true;
next();
},
created() {
if (window.plus) {
this.plusReady();
} else {
document.addEventListener("plusready", this.plusReady, false);
}
},
mounted() {
this.getFile();
},
methods: {
onClickLeft() {
this.$router.go(-1);
},
plusReady() {
var ws = plus.webview.currentWebview();
console.log("hello plus");
},
getFile() {
let files = [];
plus.io.requestFileSystem(
plus.io.PRIVATE_DOC,
(entry) => {
let directoryReader = entry.root.createReader();
directoryReader.readEntries(
(fs) => {
for (let i = 0; i < fs.length; i++) {
if (fs[i].isFile) {
files.push({
name: fs[i].name,
fullPath: fs[i].fullPath,
url: fs[i].toURL(),
});
}
}
this.pdfh5 = new Pdfh5("#demo", {
// 加载进度条
loadingBar: false,
pdfurl: files[0].fullPath,
});
//监听完成事件
this.pdfh5.on("complete", function (status, msg, time) {
console.log(
"状态:" + status + ",信息:" + msg + ",耗时:" + time
);
});
//监听失败事件
this.pdfh5.on("error", function () {
Dialog({ message: "查无文档" });
});
},
(e) => {
//失败操作
Dialog({ message: "调用失败: " + e.message });
}
);
},
(e) => {
Dialog({ message: "调用失败: " + e.message });
}
);
},
},
};
</script>

<style>
* {
padding: 0;
margin: 0;
}

.outBox {
margin-top: 3.5rem;
touch-action: none;
width: 100%;
height: 100%;
}
</style>

打包

npm run build后使用 Hbuilder 打包应用即完成。


Camera 流

具体实现

1
2
3
4
5
6
7
8
9
10
11
12
13
14
15
16
17
18
19
20
21
22
23
24
25
26
27
28
29
30
31
32
33
34
35
36
37
38
39
40
41
42
43
<ul class="mui-table-view">
<li class="mui-table-view-cell" id="device.html" @click="getImage">
<a class="mui-navigate-right">
调用拍照
</a>
</li>
</ul>
... ... ...
<script>
export default {
name: "demo4",
methods: {
plusReady() {
var ws = plus.webview.currentWebview();
console.log("hello plus");
},
getImage() {
let cmr = plus.camera.getCamera(); // 获取摄像头对象
let res = cmr.supportedImageResolutions[0]; // 字符串数组,摄像头支持的拍照分辨率
let fmt = cmr.supportedImageFormats[0]; // 字符串数组,摄像头支持的拍照文件格式
console.log("Resolution :" + res + ", Format: " + fmt);
cmr.captureImage(
(path) => {
alert("调用成功: " + path);
},
(error) => {
// 拍照操作失败的回调函数
alert("调用失败: " + error.message);
},
{ resolution: res, format: fmt }
); // 摄像头拍照参数
},
},
created() {
// 扩展API是否准备好,如果没有则监听“plusready"事件
if (window.plus) {
this.plusReady();
} else {
document.addEventListener("plusready", this.plusReady, false);
}
},
};
</script>

尔后npm run build将 dist 丢进 hbuilder 打包 App 即可。

注意事项

1、调试报错

plus is not defined

只有 HBuilder 真机运行、打包后、或流应用环境下才能运行 plus api。
在普通浏览器里运行时 plus api 时控制台必然会输出 plus is not defined 错误提示

2、出现白屏

将 Vue 项目中 config 文件夹里的 index.js 文件中 assetsPublicPath 由’/‘改为 ‘./’ 同时删除路由模式或者改为 hash

3、缩放卡顿或无法缩放

检查是否有诸如引入 zepto.js 引起的冲突

4、文件打印乱码

确认 pdf 是否用了第三方库字体

5、引入文件后 pdf 不显示

需要逐一排查,一般地是属于路径问题,观察报错信息,如果 error 为 pdf.js annotationstorage: annotationstorage?.getall() 一般是 pdf 文档存在图章引起的问题。

6、如何使用 blob 文件流传输

vue-pdf/pdfh5 均可以实现 blob 文件对接

参考文档

html5plus 规范

vue 使用 vue-pdf 实现 pdf 在线预览

Vue PDF 文件预览 vue-pdf

2021 pdfjs 在 vue 中的使用

vue 项目 pdf 预览插件 pdfh5

vue 项目文件流数据格式转 blob 图片预览展示